Website powered by

Creating Realistic Skin in Substance Painter 1: Height

Tutorial / 20 May 2022

Over the past year I've focused on my Sculpting skills, this lead to me ignoring some of the other necessary skills necessary for good Character Art. To rectify this I did a deep-dive into creating realistic skin using ZBrush and Substance Painter, for rendering in Unreal Engine 4. Through this little series I'll be detailing how I made the Height, Diffuse, Roughness and Subsurface maps. As well as some experiments I did along the way. 

When it comes to creating skin, or texturing any character model a good first step is height detail. Good height and normal details create the necessary bake data for our Diffuse and Roughness portions to be far more detailed, far easier. 

Necessary Skin Details: 

  • Pores
  • Micro-creases/Skin Direction
  • Necessary Variation

I will refrain from including too detailed reference images because they can get kinda gross. 

EXPERIMENT: TEXTURING DETAILS VS SCULPTING DETAILS

Texturing Details

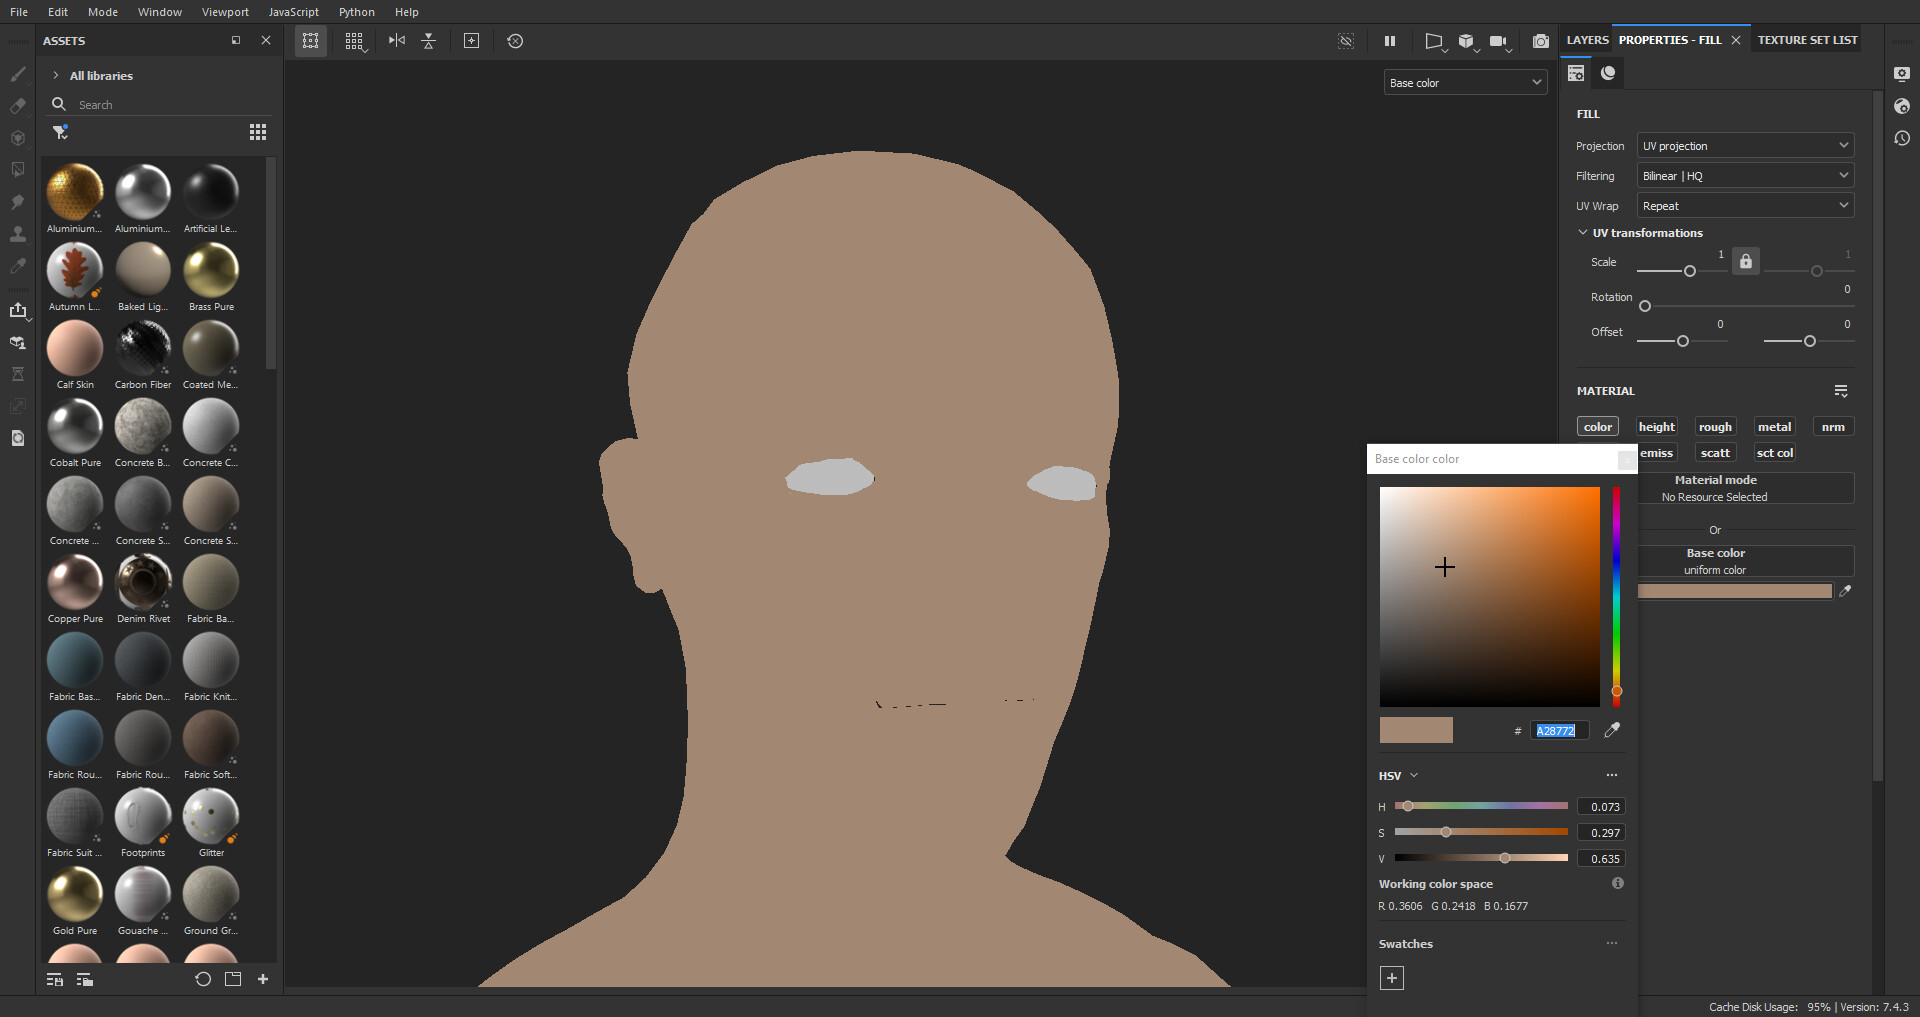
Substance painter has a rather large collection of Skin Materials to be used on different parts of the body. These can range from something as small as lip details to something as large as back creases. When I started this project I decided to see how far I could get with these materials alone. Spoiler Alert: Not Very Far. 

The process involves 3D projecting the tileable materials onto the mesh, increasing the tiling, and masking out where you want them to be. With the occasional 2D material needing to be translated to the right spot in UV space.

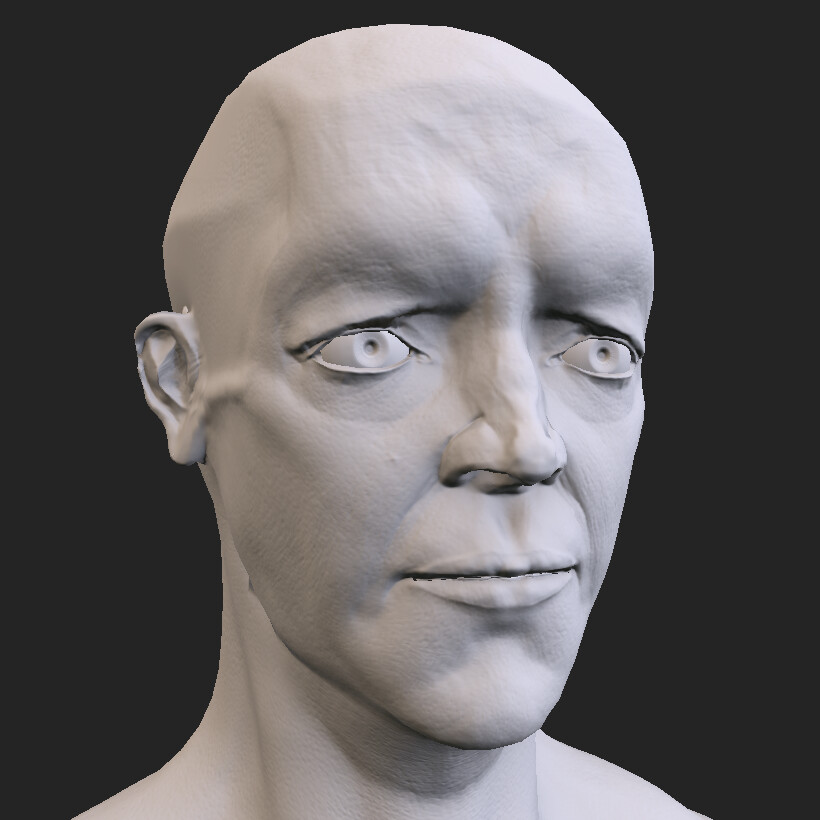
Here are the results of the face. It's kind of there but it doesn't fit on the face right. The pores around the nose area are too intense, even at 1% intensity. The pores and wrinkles here, even at higher resolution, don't look they have much direction or purpose. It just looks like noise in some areas. Creating good variation in pore size will fill up your layer stack quickly, something I'm not especially comfortable with. Overall, not a completely unexpected outcome. 

QUALITY:  These materials can only go so far. For the purposes I want, they simply don't go far enough. They're a pretty quick way to get something. They might come in useful to supplement any spots I miss when I sculpt these details.

COMFORTABILITY: The process of dragging in, changing the scale, changing the intensity and THEN masking out specific areas is one I find very clunky.

EFFICIENCY: These materials come built in. No need to go Alpha hunting on the Marketplace. For creating a base layer of Skin Pores or Skin Creases this is far quicker than creating it in a sculpting program, baking it, and then continuing to work in Substance Painter. 


Sculpting Details

In contrast, ZBrush has very little skin resources built in. There's a couple things that Noisemaker can do but that suffers from similar drawbacks as texturing details above. This is 50% a process review, and 50% shill of J Hill's Skin Detail's Kit. I used the brushes there to create varied skin details of a consistent quality. Despite this, remember, the best alphas and brushes are useless in the hands of someone that doesn't know how to use them. 

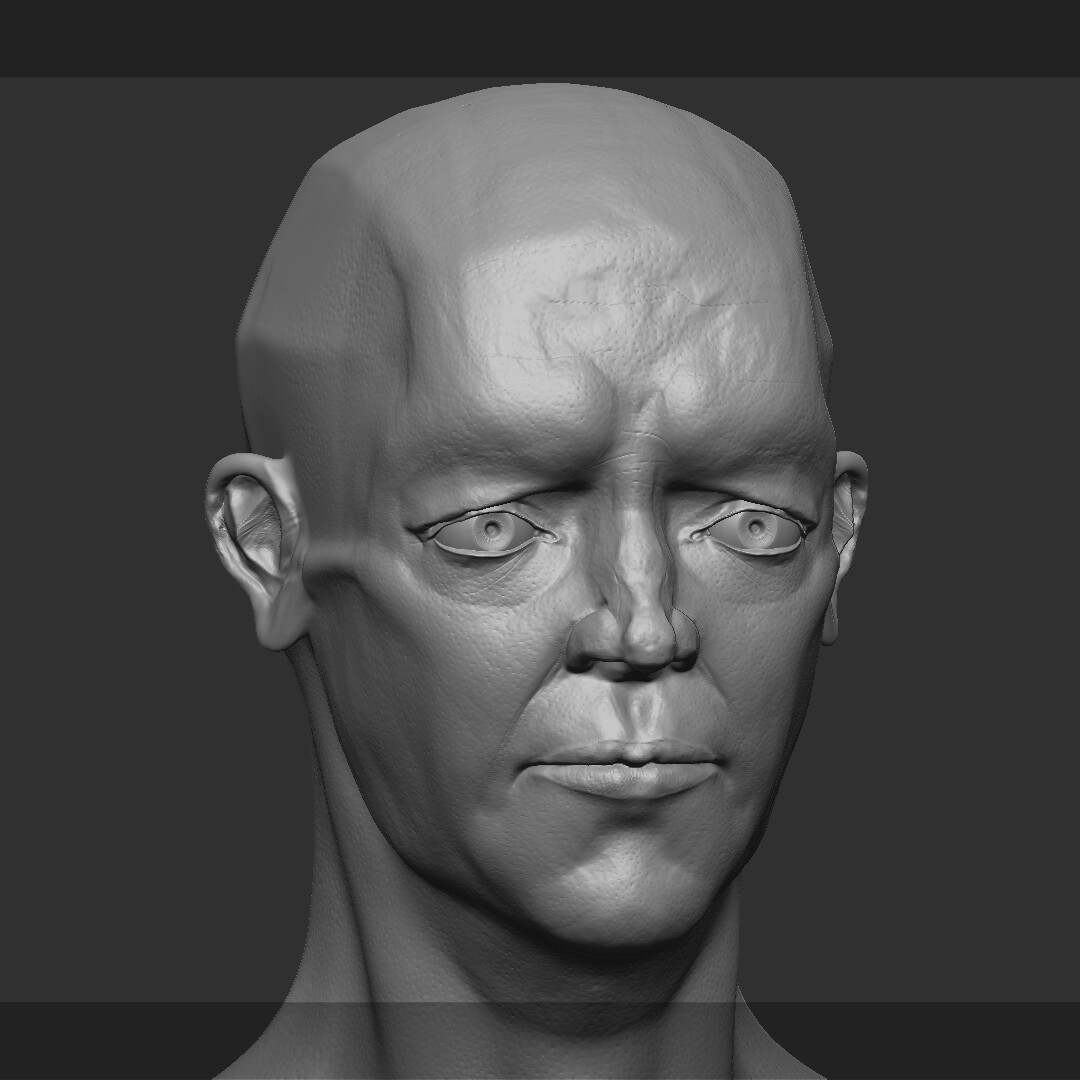
Sculpting these details by dragging out an alpha will immediately create some variation in Pore and Wrinkle Sizes, making our skin look far more natural. The difference here is subtle but enough, and we can immediately use our Mesh Maps to drive our skin details. There isn't much to say other than:

QUALITY: The overall quality is greater because I have more control over the Size and Intensity of these details. We don't have to worry about any tiling textures or scrolling through Substance Painter for us to add exactly what we want. 

COMFORTABILITY: I sculpt everything as much as I can, so sculpting these details in Zbrush is essentially second nature. The only drawback I have is how many polygons are needed for these details to come through, I'm working on a decent laptop but even then it chugs when I get to a high resolution. 

EFFICIENCY: This is where Substance has got Zbrush beat. At least for me, dragging out Zbrush Alphas and brushing in details takes longer than adjusting parameters and masking. Though we don't have to do any fiddling about with height-to-normal filters or anchor points for our height details to start driving our diffuse and roughness maps later down the line. 


=============================================================

With that experiment over, let's get into HOW and WHY we can create proper height detail. 

All these following techniques work throughout the whole body but for focus I'll be keeping our attention on the face here. 

Step 1 will be adding skin pores! This is pretty easy but be wary if you have any form of Trypophobia. Good reference is key, so make sure to get some high quality, high resolution images. Size, Depth and Variation are the only things to keep an eye on. Working with something like ZBrush layers is a great way to have a lot of control over the depth of the Skin Pores. I always over sculpt so that I can use my layers to reduce it a little bit. Keeping our attention on the face, we can see here:


 Our skin pores exist! They're there. It still looks off though. Something isn't right, and that's because our skin lacks DIRECTION. What do I mean by this? Our skin is very squishy, and our body moves a lot. Skin Direction is essentially the micro-creases in our skin caused by simply moving. It adds flow and breaks up all the holes in the skinSkin direction, these micro-creases flow perpendicular to how our skin moves. After looking across some reference, I made this little guide for the face.  

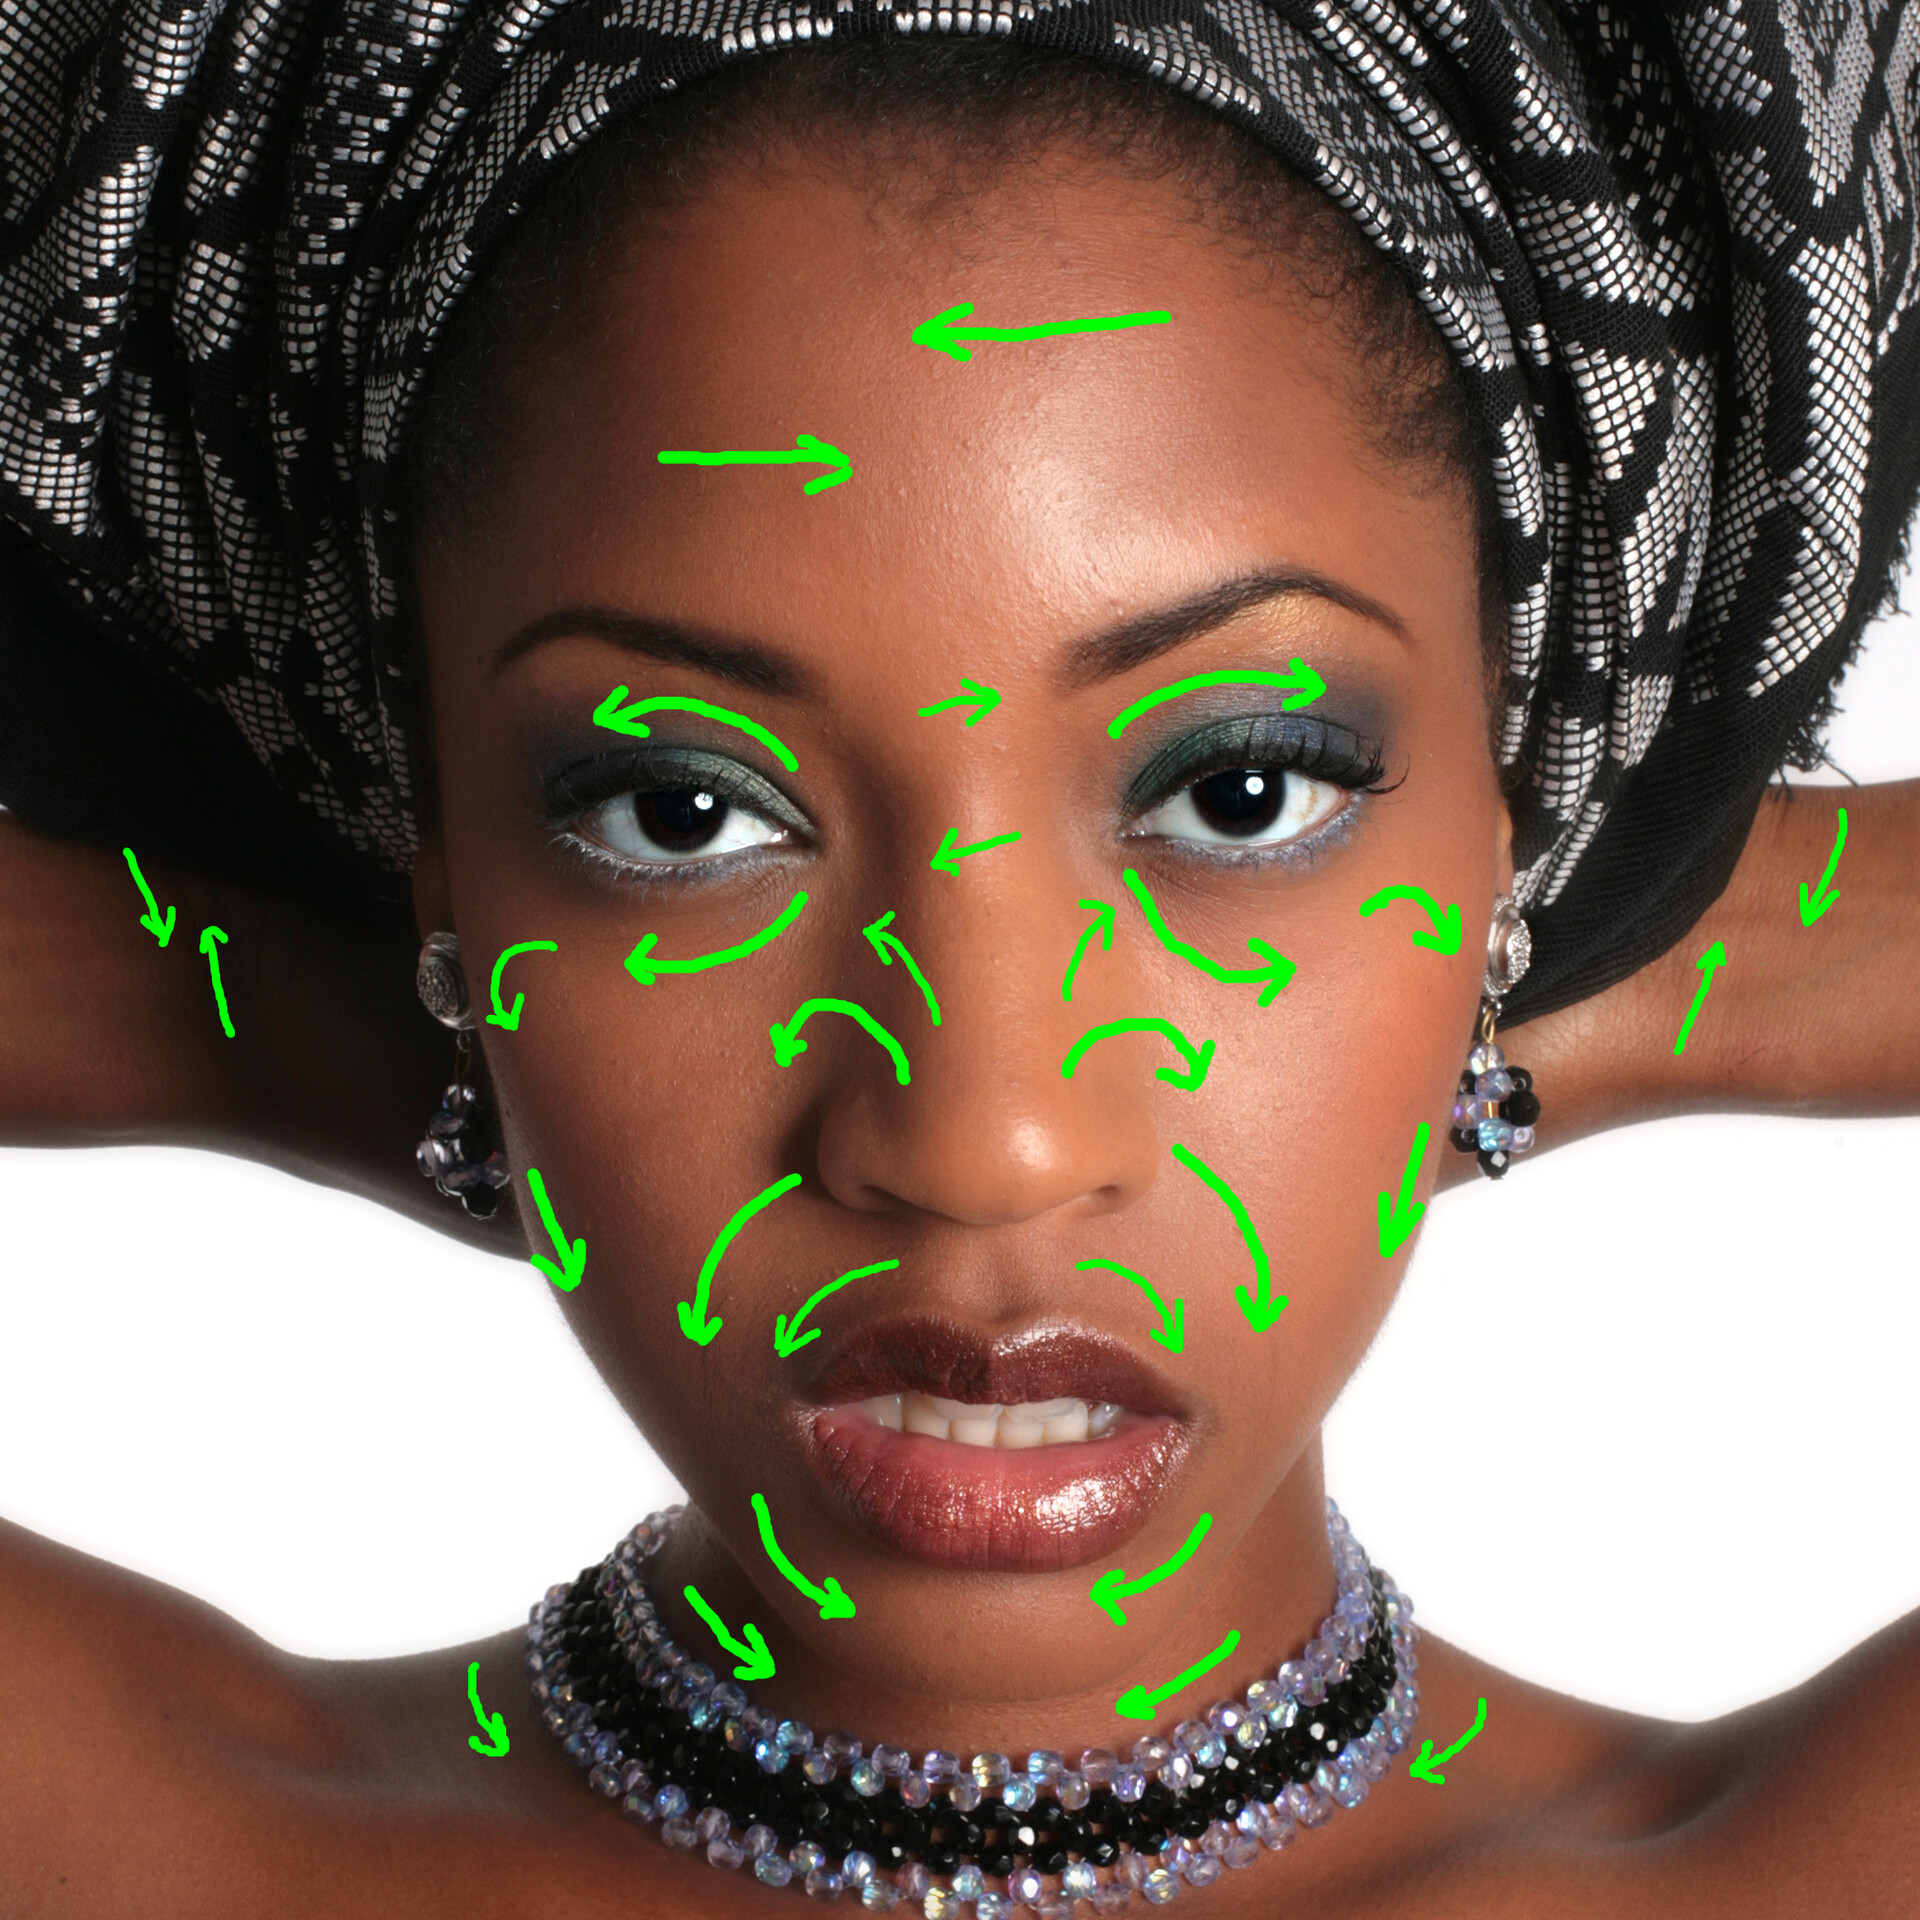
All these arrows are how the little micro-creases across the face flow, this is only a general guide because all faces are different. But this is what it would usually look like. When it comes to brush work inside of ZBrush, I used J_FineWrinkles from this, although if you don't have J Hill's Skin Detail's Kit the Dam Standard with Alpha 60 set to Colour Spray will work just fine! If we follow the guide above and add micro-creases in the areas and directions above on a new Zbrush layer we could come up with something like this: 

Our skin has little creases and with it: direction! Adjust this layers intensity however you want, the deeper the creases, the older your character will look. These are two pieces of a whole, so after we add our creases it's time to turn on the pores and adjust the intensity of both. Our goal here is to marry them together. There's no tricks here, just make sure you have good reference and a keen eye.


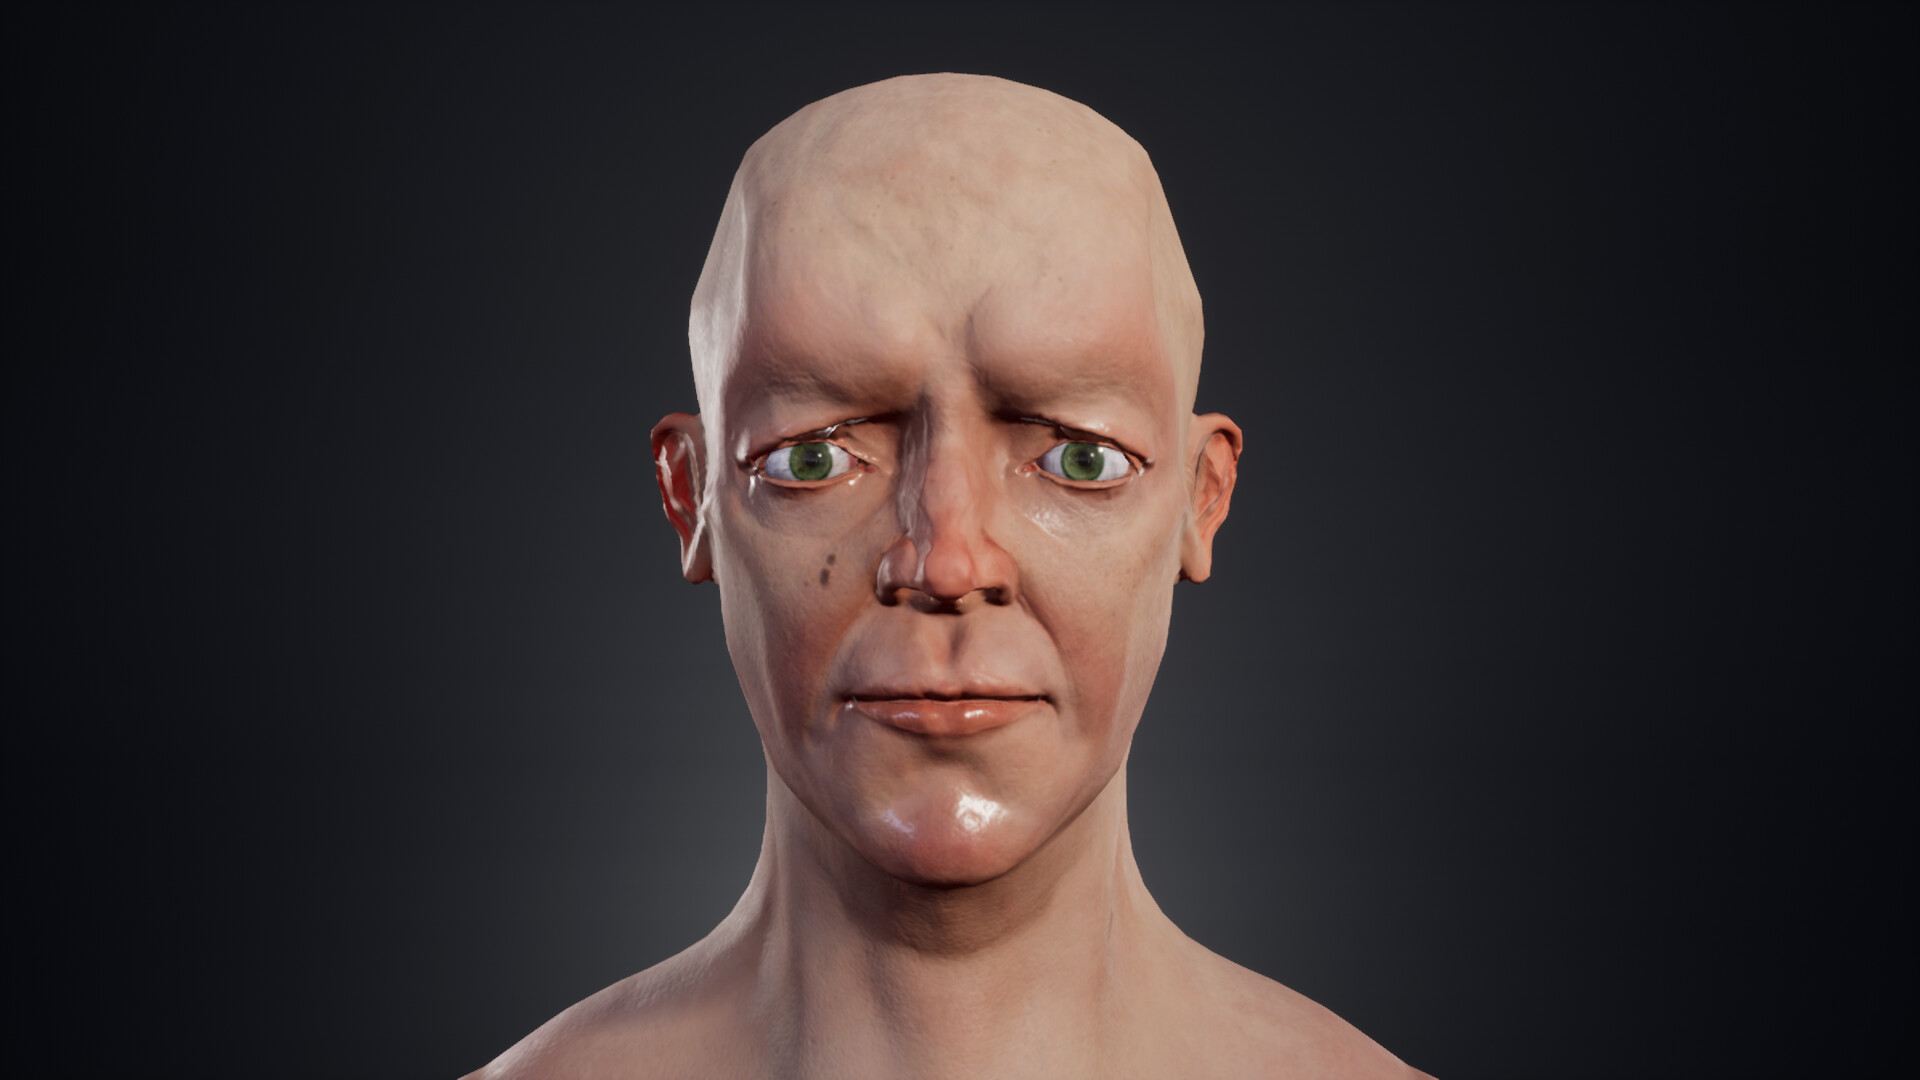
And here it is! A face with some good height detail. After baking we should have some excellent AO, Curvature, and Thickness maps to drive the rest of our texturing process. 

Thanks for reading along! Up next is all about creating the Diffuse map.

Rendering a High Fidelity Eye in Unreal Engine

Tutorial / 25 January 2024

Overview

Rendering eyes is hard. They’re complicated and nuanced. They require a physical understanding of the anatomy of the eye, as well as technical knowledge and a creative eye to achieve this. I’ve experimented with different variations of the techniques here, but after looking at the face models for Baldur’s Gate III I managed to figure out my current method.

Here is the end result:


Contents

Meshes

  • Physically based
  • Eyeball
  • Cornea
  • Creatively Based
  • Eyeshadow
  • Mesh setup

Textures and Shaders

  • Eyeball UVs
  • Eyeball Material
  • Cornea
  • Eyeshadow UVs
  • Eyeshadow Material
  • Creatively Based and Technically Limited

Appendix

  • Lighting for Eyes

Meshes

Physically Based

When constructing the mesh of the eye we need to understand the anatomy of the eye.


This is a simplified diagram of a human eye. All we need to take note of is the inner layer where the Iris, Pupil and Lens are - we’ll call this the Eyeball and the outer layer called the Cornea.

For an accurate looking eye we need to design our meshes to reflect that of real life, but for a good looking eye we sometimes need to deviate and use our creative vision.

Eyeball Mesh

This is the colour of the eye. The iris, sclera and pupil. Although not physically accurate, I like to add a divot to the iris and a cavity to the pupil to give the eyeball more depth. 


This shape creates the correct shadowing on the eye.

The best way I’ve found to do this is:

  1. Create a sphere
  2. Rotate it 90 degrees
  3. Soft select an area radiating from the Pupil. It’s easy to make this area too large on the first try. Aim for having this area be about the same size as your characters eyelids. 
  4. Pull this selection in to create a Iris Divot
  5. Select a smaller area of polygons
  6. Extrude this selection in to create the Pupil Cavity.

The Cornea

The Cornea is responsible for the reflections on our eye. Our Cornea mesh should have an area around the pupil that pushes out. The best method I’ve found for this is

  1. Make a sphere that is slightly bigger than the Eyeball Mesh. We just want our Cornea to cover our Eyeball Mesh. 
  2. Rotate that sphere 90 degrees
  3. Soft select an area about the same size as the area of the iris we did previously
  4. Push it out to create the bump of the Cornea!

Take your time shaping the cornea of the eye, while the cornea doesn’t make it in-engine it’s a very important tool that will help us when creating the final mesh that does. 

Creatively Based

If we skip ahead and continue adding materials with our current mesh setup, this will be the end result.

While being physically accurate, this looks very creepy. It’s got that thousand yard stare. It stares into your soul. It’s missing that life.

It’s missing a shadow under the upper eyelid. We can paint this on our eyeball texture but that would be very limited as it won’t follow the eyelid as our character’s eyes close or move around.

Eyeshadow

To appealingly render eyes we need to add a shadow under the top eyelid that can move with our characters eyelids as they blink. The best way to do this is to add a new mesh over the cornea then add a material to it in Unreal Engine.

The quickest way I’ve found to do this

  1. Duplicate the Cornea mesh
  2. Scale this duplicated Cornea mesh up by a slight amount.
  3. Set this new Cornea mesh as a Live Surface and create a strip of polygons over the exposed area.
  4. Model a small strip of polygons so it covers the tearduct of the eye.

Mesh Setup

Our three meshes should be layered on top of each other. The setup should be:

Eyeball - Cornea - Eyeshadow

The eyeball should be behind everything, the cornea in the middle, then finally the eyeshadow being on top.


Textures and Shaders

Eyeball UVs

To get a correct eyeball texture we need correct Eyeball UVs. A good eyeball texture should have no seams along the iris or pupil. A good pack for these textures is 50 Eyes Textures & 20 Eyes Alpha Textures Pack Vol 01 by Yacine BRINIS.

The only UV Seam should be at the back of the eye where we can’t see it. The best way I’ve found to do this is

  1. Delete the back half of the eyeball
  2. Planar or Camera project your UVs at the right angle to create easily workable UVs
  3. Scale up or down to suit your texture

To get this onto both eyes, simply mirror the eye mesh over to the other side of your character and it should all be fine.

Ignore the texture repeating for now. We can fix that inside Unreal Engine.

Eyeball Shader

The Eyeball Shader in Unreal Engine is extremely simple. All we have to do is plug in our Eye texture into the Base Colour and change our textures Sampler Source to Clamp. To make suer there's no weird reflections I turn my roughness up to 1. 


Cornea Material

The material for the Cornea is very simple. All it requires is a base colour of white, very little roughness and opacity and to be set to be a Thin Translucent Material.

Eyeshadow UVs

To properly use the Eyeshadow material we’ll be making we need our Eyeshadow UVs need to stretch across our entire UV tile regardless of any distortion. A good example of what our Eyeshadow UVs should look like is this. 


The top edge of our Eyeshadow UVs should be as flat as possible so that the gradient we create lines up with the curvature of the eyelid and eyeball. Distortion here is important because we’re making it work for us. 

Eyeshadow Material

This is the meat and potatoes of our shaders, this is probably the most important material we make due to it's subtle but important impact on the final product of our Eye rendering.

The eyeshadow material is just a linear gradient controlling the opacity of a Translucent material.

To begin with change the Blend Mode of the Material to Translucent.


To create our gradient add a Lerp, 3 Scalar nodes, an Add node and a Clamp node.

The two scalar nodes should be set to 1.2 and 0. Plug the Scalar Node of 1.2 into the A input of the Lerp Node and plug the Scalar Node of 0 into the B input of the Lerp Node.

Plug the output of that Lerp into the A input of the Add Node.

Plug the output of the Add Node into the Clamp Node. Set the Clamps ranges to: Min 0.1, Max 1.

Create a Parameter (s + click) called Eyeshadow Intensity and plug this into the B input of the Add Node. I find a useful starting value to be -0.376.

Plug the output of the Clamp into a Vertex Interpolator Node and plug the output of the Vertex Interpolator Node into the Opacity channel.

Set the final Scalar Node to 0 and plug it into the Base Colour input.


These are the minimum and maximum values of our gradient but there’s nothing controlling the Lerp blending the two colours together. Let’s create that now.

Start by creating a LinearGradient Node, a Power Node, a Multiply Node and an Add Node.

Plug the V Gradient of the Linear Gradient Node into the Base Input of the Power Node.

Plug the Output of the Power Node into the A input of the Multiply Node.

Plug the Output of the Multiply Node into the A input of the Add Node.

Plug the Output of the Add Node into the Alpha of the previously made Lerp Node.

Create three Parameters. Call them Eyeshadow Power, Eyeshadow Multiply and Eyeshadow Add into their corresponding nodes. Some good starting values are Eyeshadow Power: 1.0, Eyeshadow Multiply: 0.8, Eyeshadow Add: -0.136.

Now our Opacity is controlled by a fully controllable Linear Gradient that blends between Black and White. All we have to do now is fill out the rest of the material. Our final material should look something like this. 


Creatively Based and Technically Limited

When our meshes are properly placed and our materials are all set up we should end up with a result like this: 


That’s pretty good! If the eyes on your model still look odd or strange try tweaking the different scalar parameters to suit your needs.

While the render does look quite good if we have a look at the complexity of the model we can see that it’s not that good.

Performance wise our eyes are really, really bad. This is simply caused by having two translucent materials on top of each other. The best fix for this is to remove one of them. While the Cornea of our eye is anatomically and physically accurate the Eyeshadow material delivers a greater and more artistic result. So the Cornea has to go.

The Cornea mesh and material are no longer needed, they helped us create the shape of the Eyeshadow Mesh but they are too taxing for the small benefit of having them.

The reason we keep the Eyeshadow mesh instead of putting our Eyeshadow material on the Cornea mesh is because the Shadow on our eyes follows the eyelids and not our actual eyes.

With the Cornea mesh deleted our final product looks like this.


There's a slight change on the colour and shine on the eyes. It's very subtle but if you look hard you can see it. While the shader complexity looks like this. 

Overall a good tradeoff for such an important part of a character for such good quality. 


Appendix

Lighting for Eyes

The mesh and shader setup for our eyes is only half the process, the rest comes from our lighting setup. While the lighting setup isn't complicated it does need to be considered when creating high quality renders. When I put together a simple lighting setup of two spot lights pointing at the character we get this result. 

It’s not quite there, this guy looks dead. The shine on the eyes aren’t quite right. It’s too small, too thin. That’s because light doesn’t come from an infinitely small point in space. Light gets emitted by 3d objects in real space. A lightbulb however small still has mass and size. So all we have to do is add a source radius to our lights in Unreal.

If I set both of my lights to have a source radius of over 20 then we get this result. 


Immediately better! The shine on the eyes is far better, far more realistic and just feels to have more life to it. 

Overall a good pair of eyes for a cinematic render! 

Anatomy Studies - Sections

General / 02 December 2022


Some anatomy studies I've done over the past 2 weeks. My primary reference for these was a 3D scan I bought


Creating Realistic Skin in Substance Painter 3: Roughness and Scattering

Tutorial / 20 May 2022

Over the past year I've focused on my Sculpting skills, this lead to me ignoring some of the other necessary skills necessary for good Character Art. To rectify this I did a deep-dive into creating realistic skin using ZBrush and Substance Painter, for rendering in Unreal Engine 4. Through this little series I'll be detailing how I made the Height, Diffuse, Roughness and Subsurface maps. 

We've got our Diffuse map done and dusted. In my opinion, that's the hardest part. Roughness is pretty easy, we just need to have good reference, a keen eye and make sure to break up the homogeny. We've already done similar to this with Fill Layer Dirt 4... set on multiply. It's the same sort of practice going ahead, just with more control over layers. All new fill layers will have only roughness data. No Colour. No Metallic. No Height. Only Roughness.

Now, getting started here is a lot easier than getting started with the base Colour of the skin. We get a Fill layer, set it to only roughness and set roughness to 1. Look at that, so easy I don't have any little videos to show the process. Now, I know I just said there's no base colour data but this is the One Exception. Set the base colour to digital black, this gives us a really easy way to see the effect of our roughness maps. 

 This base layer is also our Cavity Roughness, so all our other layers are going to be built up from this. To make this cavity roughness, well, CAVITY roughness our next layer has to be only the peaks of our model, this could be done thorough an elaborate series of AO masks and paint layers OR we could use a Curvature Mask like we did in the previous part. 

Create a Fill Layer with only roughness data and set the roughness value between 0.4 and 0.5. Add a Bitmap Mask using our curvature mask and then add a Blur Filter with a small intensity to remove any sharp edges. 


Now our cavity's are nice and rough while our peaks have a very different value! Great! But, just like when it comes to the Diffuse the key thing is 

BREAKUP BREAKUP BREAKUP

So our next couple layers are going to be all about that. Next, create 2 more fill layers. Set the first one to have a roughness value greater than our Curvature Roughness but less than our Base Layer, I put mine at about 0.6-0.7. The second one should have a roughness value lower than our Curvature Roughness, I usually put this between 0.1-0.2. Mask these out with a fill of either Clouds 3 or BnW Spots 1. Let's do that all now.


Adjust the blending modes and opacity to something you find satisfying. Remember, the goal here is breakup and variation. 

That's about as far as we can go with automation and basic fill masks. The rest is handpainting the SHINY areas. Around the eyes, around the lips and nose, in places where sweat builds up like the armpits, under pecs, even the hands to a degree. I put the tear ducts on a new layer and make that EVEN shinier. And then for even MORE breakup, I create a new layer, set it's roughness value to about 0.25 and hand paint some areas with a spots brush, I usually put this on areas where the skin moves, and where it sweats, the forehead, breaking up the eyes and mouth, around the cheeks, under the neck. Just some more breakup and non-uniformity. 

Let's do all that now.  

That's really hard to see in the Material view, let's switch to the roughness view. 

That's WAY clearer for us to see. Continue this process throughout the whole body, keeping in mind where sweat and occlusion would occur and you'll have a perfectly shiny body in no time. Change the blending modes and opacity as you see fit, every body, face and project is different! When you think you've got all your layers, create a new folder and put them all inside and set that folder's blending mode on Base Colour to Screen. That'll remove the digital black we created to see all our roughness details. 


Now, onto scattering. Scattering's the EASIEST part here because it relies on a mesh map we already baked out. Thickness! The techniques here aren't hard, they're just a little repetitive. Just make sure you have your scattering maps enabled in Substance. Pull up your texture set settings, go down to channels, hit that little icon and click on scattering. Just like that we can work on our scattering maps. The whiter the value, the more intense the scattering. 

So. Scattering step 1: the Base!

This is the easiest bit yet. Create a fill layer, set the scattering value to something really low, under 0.1. This is the base SSS of the whole body, it's not much but in a renderer like Unreal or Marmoset this little bit goes a long way. 

Next, create a new fill layer and mask it off based on your thickness, just like we did with the roughness at the very start. Add a Levels and Invert. Now we're going to create the slightly more intense SSS that happens around the cavity's in our body. We do the same thing as we did in the last step but with Curvature instead of Thickness and adjusting the levels a little more extremely. 


Next comes the more specific parts, like the face, the hands, and the feet. The goal here is control and consistency while SSS looks good, too much destroys the detail in our Diffuse and Roughness maps. This is where the Levels we've been using comes in really handy.  The whitest part of our whole model should be the ear and nose. Depending on how your Thickness map was baked we might have to separate our detailed SSS into three layers. For the Face, Hands and Feet. Let's start with the face.

Using a Thickness mask and some Levels our goal is make the ears the most intense while generally reducing the SSS of everything else. This isn't hard just finicky. 


That's pretty good, now just mask out everything below the neck and we can move on! Usually I leave whatever blending modes the layers are on up to you, but when it comes to Scattering I highly recommend everything except the base layer be set to screen. That way we can build up our scattering detail without destroying what's underneath. 

Usually this is where I'd leave it, all the concepts and practices here are easily applicable to all the other areas of the body but I find Scattering to be really finnicky, so I'll cover the hands and feet as well. 

When it comes to the hand, the tips of the fingers should have the most intense scattering, but not more intense than the ear, or even the nose. I think the chin is a good reference in value. It's a thin amount of skin over almost direct bone. The rest of the fingers should have a bit of a gradient before completely fading into the palm. The feet is almost the exact same thought process.  The method is the exact same as the face, Thickness Map, Levels, Paint out. 

And just like that we're done! Overall not that hard, just requires a little know-how, some good reference and a keen eye. That's a full human person, of course there's going to be some LookDev in your renderer of choice but that's about as far as we can push it in Substance. 

After setting up in Unreal Engine 4 we can see our final result. 

It looks good! Detailed height, very natural colour, believable wetness and roughness and good SSS.


Thanks for reading along! I hope this is all useful to you.  

Creating Realistic Skin in Substance Painter 2: Diffuse

Tutorial / 20 May 2022

Over the past year I've focused on my Sculpting skills, this lead to me ignoring some of the other necessary skills necessary for good Character Art. To rectify this I did a deep-dive into creating realistic skin using ZBrush and Substance Painter, for rendering in Unreal Engine 4. Through this little series I'll be detailing how I made the Height, Diffuse, Roughness and Subsurface maps.

So, we've got our model in Substance Painter. It's got good height detail, everything's baked and ready to go. Going forward all new layers will have only colour data. No roughness. No metallic. No Scattering. Only Colour. It's a good practice and helps keep everything clean and organised on a natural model like this.

So, how do we start working on the Diffuse? Here comes the most difficult part for me. Creating the Skin Base layerI have found no tricks for this other than trial and error. Caucasian skin fits in the desaturated orange region so I usually start there and adjust until I'm happy. For this character I chose something like this: 


Hard part: Over. It only gets easier and more fun from here. 

Step 2: Ambient Occlusion. Take that skin layer, duplicated it, make it redder, more saturated and darker. Something like this:

Then all we have to do is mask it out using our AO map. I add a bitmap mask using our baked AO map and add a levels. I simply invert the levels, and boom! We've got some decent AO and idle SSS. I use a levels instead of an Invert Filter because we have more control over the AO with a levels. We can clamp and bring in values as we need them. Remember this, we'll be using it a lot later. 

After the AO I tackle the Subdermal Colour Zones. There's plenty of reference out there for those colour zones around the face but not much for the rest of the body, so I made a Human Subdermal Colour Zones model that outlines where all the Red, Blues and Yellows are through the whole body. For some reference that isn't mine, have a look at RBX imaging, which is a type of imaging meant to detect sun damage through the skin. It clearly shows where the reds and yellows are through the face. In darker skin tones these Subdermal Colour Zones are a lot more subtle

I like to tackle the RED first because it's the most obvious. The red areas of the face and body are where the skin is thin and/or there are a lot of muscles, and therefore blood vessels. To make these subdermal colours look good, natural and believable the name of the game is:

BREAKUP BREAKUP BREAKUP

To start I break up the painting of these areas into 3 paint layers. The Base, which are the lightest areas. The Mid, which is where these areas start getting obvious. The Deep, which I put around the nose and cheeks. To save another layer stack I put another paint layer on for the lips. I use a Dirt 1 brush with a low flow and stroke opacity, it's a very natural brush that creates some good layering and a very natural breakup.

Just these 4 layers by themselves still create a very painted on feel instead of the natural layered feeling we're after so on top of all this I put a

FILL LAYER DIRT 4

set on multiply. Up the scale, adjust the balance and decrease the opacity and this creates a semi-random and natural break up of the values.

Next we do the same thing for the yellows and blues. Breaking the paint up into 3 layers varying in intensity and adding a 

FILL LAYER DIRT 4

set on multiply over the top.

The blues on our body are due a large collection of veins carrying de-oxygenated blood.  This is most obvious on the face and jaw because of how thin the skin is. The yellows areas on our body are due to the lack of muscle and blood vessels, it's kind of like a neutral zone. The forehead, elbows parts of the forearm are pretty noticeable yellow spots. The overlapping the yellows of our body are similar browns for the same reason, for our brown layer all we have to do is duplicated our yellow layer and adjust the FILL LAYER DIRT 4. There isn't much special or different about the methodology, just the placement so I'll just show the buildup of blue, yellow and brown at the same time.


This is still a bit homogenous, even with the different colours. The yellow and brown's a bit overpowering, so now it's time for even more 

BREAKUP BREAKUP BREAKUP

Human skin has a wide variety of colours. We can go more intense with some of the veins, add some burst capillaries manually, add some more intense brown spots, bring in some more fake SSS based on our Thickness Map and add more pinks based on our Curvature Map. So let's do that now. This is probably the last we can do through generators and Mesh Maps. 

Our fake SSS is going to be faked in two ways, by adding a peachy colour based off the Thickness map and a Deep Red based off the Curvature map. We can adjust these through the use of Levels, like we did all the way at the beginning with the Ambient Occlusion. Despite the hand painting and using our mesh maps, sometimes a grunge smart mask is just what you need. I find the Dust Dirty smart mask to be great with a FILL LAYER DIRT 4 set to multiply on top. Let's do that now. 


Now all we have to do is manually paint out the areas we don't want. Easy peasy. 

The visibility of actual veins differs from person to person. Unlike the general dark blue areas, we'll be looking at the thin lines that can sometimes be visible. If you've got really pale skin you can see these on the underside of your wrist. Only one of these lines are visible on the Human Face, you can find a good reference here.

 At the same time we'll be adding some burst Capillaries using the Cracks brush, turn down the opacity and stamp away. Currently we've got a bit of a Perfect Face, this isn't very realistic so we've got to add some asymmetry with some Brown Spots and Moles. The only fancy trick here is to use the Spots brush and change the Alpha, other than that we've just got to paint them on by hand.


And that's it! That's our Diffuse map! Definitely the most complicated out of our maps, create a folder and chuck EVERYTHING inside. 

Thanks for reading along! Up next is Roughness and Scattering

Zbrush Sculpt Composites

General / 13 September 2021

For this set of composites, I wanted to try some new things. I wanted to try out some leather detailing and try some hardsurface techniques.


Zbrush Composites

General / 12 April 2021


Here's a breakdown of the matcaps and Post Processing used: